There are quite a few articles out there that cover the subject. Nevertheless, there are some improvements in Azure that simplify the whole process.
The most important improvement is, that you can now use a FQDN name to define your Local Network Gateway instead of a static IP. Back in the days where only the static IP option was available you needed an automation account, a runbook and a script to have your local network gateway updated with your dynamic public Fritz!Box IP.
Step 1: Register a MyFRITZ! account
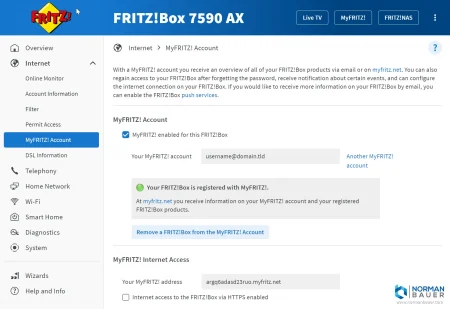
The MyFRITZ! account is used to have a domain that always resolves to the ip address of your FRITZ!Box.
In my case this domain is argq6adasd23ruo.myfritz.net. We’ll need that later.
Step 2: Create a Virtual Network
In this post all resources created in Azure are going to use the newly created resource group “AzureToFritzBoxVPN-RG”.
Create a Virtual Network in Azure
Choose a name for your Virtual Network. Or use mine: AzureToFritzBoxVPN-VN.
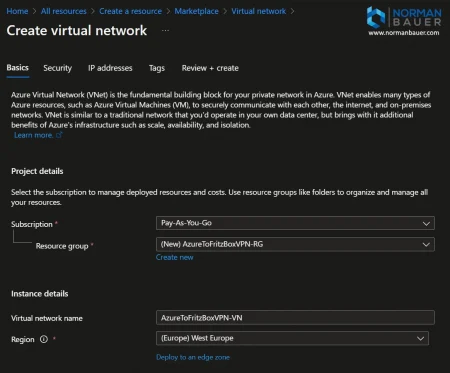
For this scenario I use an ip address space of 10.5.0.0/24.
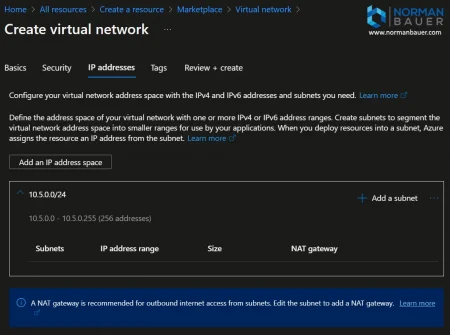
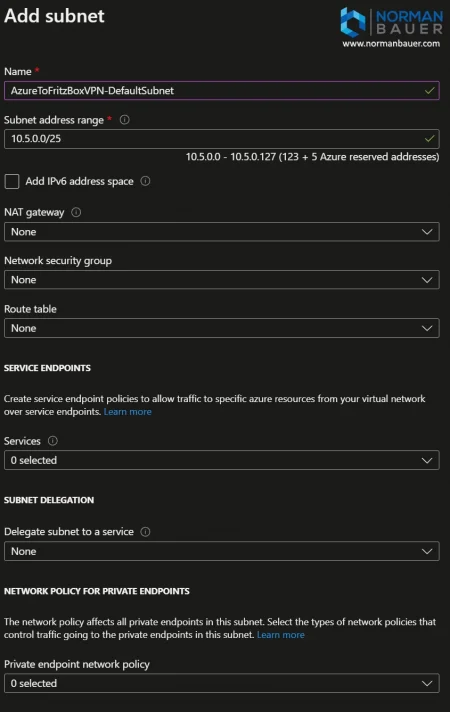
Add default subnet to the Virtual Network
For the default and gateway subnets I chose /25 subnets. For the DefaultSubnet named “AzureToFritzBoxVPN-DefaultSubnet” the range is 10.5.0.0/25.
Open the “Subnets” blade of the Virtual Network you just created. Now add a “Subnet” with the following properties.
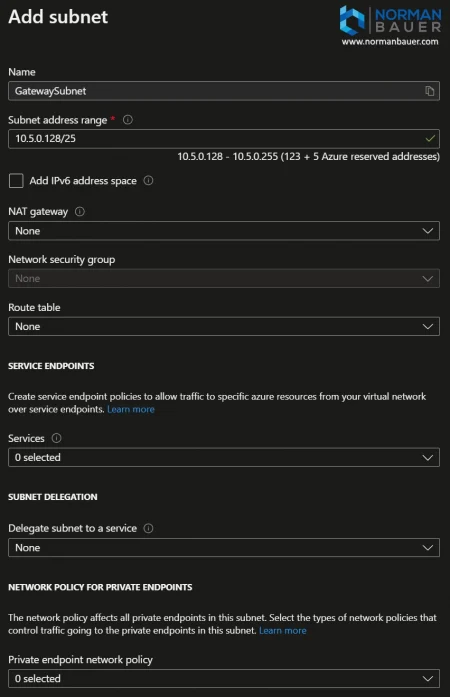
Add gateway subnet to the Virtual Network
On the “Subnets” blade of the Virtual Network add a “Gateway subnet” with the following properties.
For the gateway subnet – the name is fixed, the address range will be 10.5.0.128/25.
Step 3: Create a Local Network Gateway
Create a Local Network Gateway in Azure
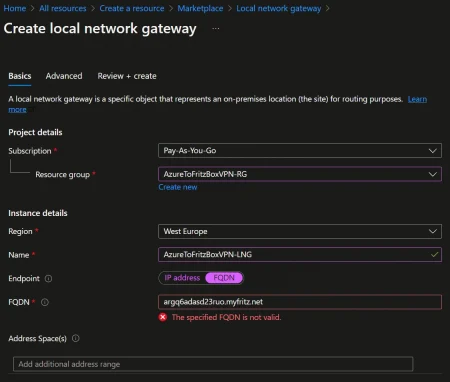
Here comes the part about the change with the FQDN. In the past Local Network Gateways had to use a static ip address. Now you can create the gateway using the fqdn of your Fritz!Box (MyFRITZ! address).
When you try to create the gateway using the Azure portal you’ll run into the following error:
The specified FQDN is not valid.
At this point we move over and use PowerShell.
If you haven’t already done so, install and import the Azure PowerShell module and connect to your Azure subscription:
Then create the Local Network Gateway using New-AzLocalNetworkGateway cmdlet with your MyFRITZ address for the fqdn parameter and your local subnet definition for the addressprefix parameter:
Note: As of August 2025 creating a Local Network Gateway using a fqdn as endpoint works as expected. For Address Spaces add your Fritzbox network, e.g. 192.168.0.1/24.
Step 4: Create a Virtual Network Gateway
Create a Virtual Network Gateway in Azure
Choose a name for your Virtual Network Gateway. Or use mine again: AzureToFritzBoxVPN-VNG.
The gateway type is “VPN”. The VPN type is “Policy-based”. SKU is “Basic” and Generation is “Generation1”.
Choose the Virtual Network you created in step 2.
I chose to create a new public ip address named “AzureToFritzBoxVPN-IP” with default settings.
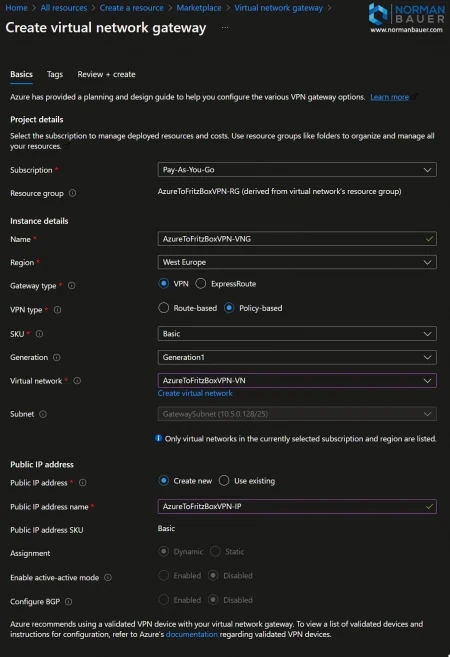
Note: The Azure Portal no longer offers the option to create VPN Gateways using the Basic SKU. If you still require the Basic SKU (e.g., for testing or cost-sensitive scenarios), you’ll need to create the gateway using PowerShell or the Azure CLI, as it’s no longer available through the portal UI. (Source)
Step 5: Connect the two gateways
Now that we have a Local Network Gateway and a Virtual Network Gateway we need to connect the two.
In the Azure portal go to the Local Network Gateway resource or Virtual Network Gateway resource and click “Connections”, than add a connection.
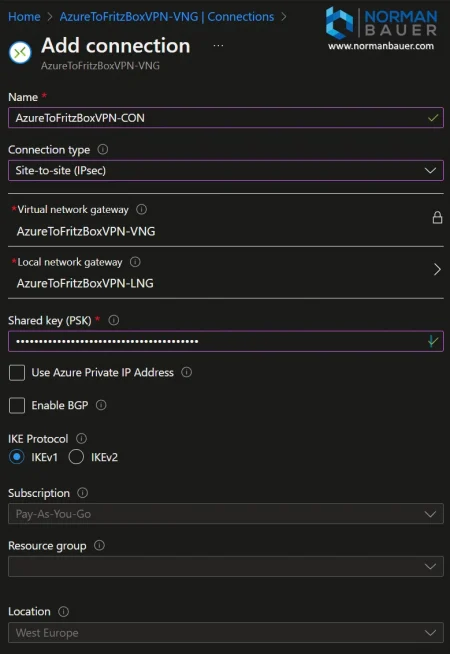
My name for the connection is “AzureToFritzBoxVPN-CON”. The connection type is “Site-to-site (IPSec)”. Now select the Virtual network gateway and Local network gateway you created in the steps before.
For the connection a pre-shared key (also key, psk or shared key) is required. This is a long password that the connection in Azure and your FRITZ!Box both need to know. So please use the password generator of your choice and create a long random password. This password goes into the “Shared key (PSK)” box and in the configuration file for your FRITZ!Box (Step 6), so please keep it for now.
For IKE Protocol choose “IKEv1”.
Step 6: Configuration file for your FRITZ!Box
This config file is a template! You are required to edit a few things!
From top to bottom:
- name: Rename this configuration as you like
- remoteip: This is the public ip address of your Virtual Network Gateway
- localid:
- fqdn: this is your MyFRITZ! address
- remoteid:
- ipaddr: Again this is the public ip address of your Virtual Network Gateway
- key: This is the pre-shared key from step 5. DO NOT USE THE VALUE FROM THIS TEMPLATE!!!!
- phase2localid:
- ipnet:
- ipaddr: this is the starting ip address of your FRITZ!Box network
- mask: this is the subnet mask of your FRITZ!Box network
- ipnet:
- phase2localid:
- ipnet:
- ipaddr: this is the starting ip address of your GatewaySubnet from your Virtual Network
- mask: this is the subnet mask of your GatewaySubnet from your Virtual Network
- ipnet:
- accesslist: this is the ip address and subnet mask of your DefaultSubnet from your Virtual Network
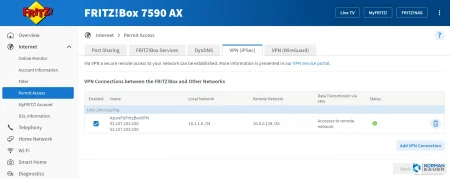
In your FRITZ!Box go to Internet > Permit Access > VPN (IPSec). At the bottom choose “Add VPN Connection”. Upload the edited and saved configuration file.
Conclusion
After importing the configuration file, your FRITZ!Box and your Azure Gateway try to establish a connection. This may take a few minutes.
Cost
This setup costs about 23€ per month for the Virtual Network Gateway.

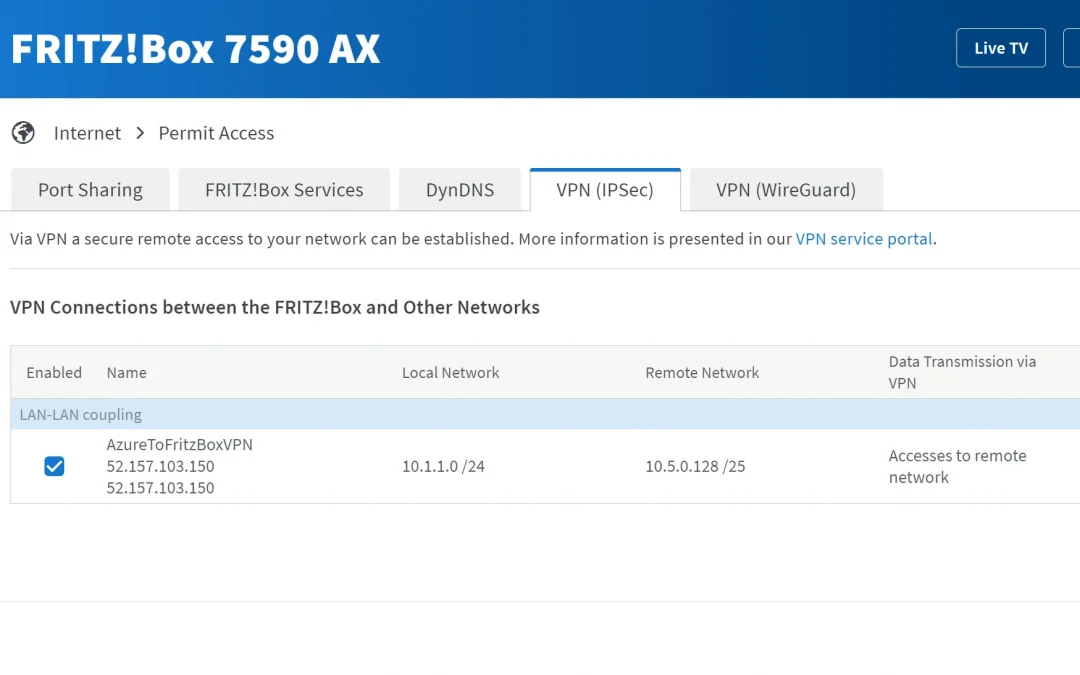


Its working like a charm. Thanks for the detailed article.
Hi – I struggle to create a site-2-site connection between my Fritzbox 7590 and Azure. To eliminatesources for potential errors, I tried to use the same IP-ranges like in your example (Azure vnet with 10.5.0.0/24, Default subnet 10.5.0.0./25 and gateway subnet 10.5.0.128/25). Creting the local GW – even with FQDN works fine in portal – I added 10.0.0.0/24 as this is my local network at hone and not 10.1.1.0/24 like yours. The VPN GW needs to be created via script, because in portal you can’t chose “basic” SKU and type “Policy-based” in portal any longer… I also had to create a public IP with “basic” SKU via script. Finally I created the GW Connection and imported the config to my FritzBox – nothing ;-( It simply doesn’t connect – Any idea, where I can dig deeper for troubleshooting?
Thanks a lot, finally after endless hours trying to make VPN work, thanks to your config file, it does!!!
I almost gave up, trying to use the very limited guy, missing parameters that can’t be set.
Again thanks a lot!!!